• Skip to main content
  • Skip to primary sidebar

Pacific Northwest Sculptors

Sculptors share knowledge and resources

  • Home
  • About
  • Galleries
  • Articles
  • Activities
    • Calendar
    • Exhibits
      • Creative Collaborations
      • Emergence
    • Ongoing Opportunities
  • Members
    • Directory
    • Member Posts
    • Member Services
    • Join
    • Login

September 2021 Newsletter

Making Aliens

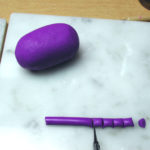
So, you feel a need to make creatures. Hopefully the following will assist you in pursuing this ambition. Then again you may come to your senses and pursue a career in accounting or as a cowpoke. Whatever your decision be prepared to accept the consequences.

Here we will focus only on making a “thing” using polymer clay and a few simple tools.

A polymer clay "thing"
A Thing

Tools & Materials

Toaster Oven

To get started you won’t need much but you will need a toaster oven that you never intend to cook food in again.  Thrift shops frequently have old toaster ovens. Test it there to make sure it works.  On the way home pick up an oven thermometer.  The dial on that old toaster oven won’t be very accurate and we’ll need to be finicky about temperatures.

You may use your home oven but I’d suggest baking the clay pieces inside a turkey bag or some oven proof container. Over time heated polymer clay releases vapors that will coat the inside of an oven. These oils may release hydrogen chloride gas when the oven is heated for cleaning. Cleaning the oven is bad enough without that.

Work Surface

You’ll want something smooth and hard like a glossy Formica table top or even a polished marble slab. Check Home Depot or a tile shop for marble tiles.  They are about one foot square and come in a variety of styles. Get a smooth one without any pits. White is best so you can see what you’re doing. Polymer clay will eat some plastics so best not to use that unless you can test it somehow.

Roller

My roller is a Plexiglas cylinder.  It’s hard, very smooth and about an inch and a quarter in diameter.  It can be used to roll out thin slabs, to mix colors and to pound the dents out of wads of tinfoil.  A thick wooden dowel would also do.  Sand it smooth.  Again, an inch and a quarter is about the right diameter.  Your roller should be about a foot long.  I got my plexiglass roller at Tap Plastics.

Pasta Press

It is possible to make thin sheets, condition the clay and blend colors of polymer clay with your roller.  But a pasta press makes it way easier. In fact the pasta press is a wonder. It does magical things. Walmart has them for $34.

Polymer Clay

Different brands of polymer clay have different characteristics.  Fimo is pretty tough but can be difficult to work with as it takes a good deal of kneading, (conditioning), to make it soft enough.  It also tends to be a little translucent.  Sculpey is easy to work right out of the package but tends to be brittle and fragile when baked.  It is good for simple thick things like grub bodies and fat snakes but makes lousy insect legs.  Premo Sculpey seems to be a happy medium between the two.  Fairly tough but easy to work. It comes in a jillion colors. You’ll want a good selection of colors but at least have black, white, yellow, blue and red.  You can mix just about any color if you have those.  A 2 oz. block should cost about $3.00. Here in Portland I get mine at Artist and Craftsman Supply. Michael’s also carries it.

Baking Pan

Non stick is best.  Try and get one that fits on the rack holders in the toaster oven.  If you are shopping at a thrift store for your toaster oven see if you can find a baking pan that fits while you are there.  When I finish a character I put it right into the baking pan.  When the pan is full of little creatures I just pop the pan in the oven.  Leave room for the oven thermometer.

Aluminum Foil

I use crumpled aluminum foil for the body shapes.  Heavy duty foil is best for the larger ones.  We will discuss aluminum foil bodies in detail.

Floral Tape (Stem Wrapping Tape)

Raw polymer clay won’t stick to aluminum foil.  It just falls off.  Wrapping the foil shape with floral tape fixes that as it’s sticky on both sides. Get it at a nursery if possible. The brand Michael’s carries is not sticky enough.

Tiles

You’ll find ceramic tiles very useful.  You can make your creature on one and pop it right in the oven without having to carefully pry it off your worksurface. You can use them to roll out clay snakes of an even diameter. Use the smooth side to roll the clay back and forth on your work surface, then either eyeball it or use a ruler to measure even lengths. That’s how teeth are made, and eyes, and suckers, and spines, and pods and just about anything where you need more than one of the same size.

A Flat Thing

Sometimes, actually every time I make a character, I have to gently pry it off my marble tile.  I have several tools that are thin and flat that can slip underneath and gently lift the creature free.  I bought mine at a jewelry supply house.  They are used for working with jewelers wax.  They were not expensive.  In such places there is usually a bin of metal tools of various sorts for a dollar or two.  An artist’s pallet knife would also work.  Whatever it is it needs to be flat and very thin.

Rounded Pointy Things

I have a variety of tools that have pointy tips that are rounded off.  The thing is when making a mouth for example you don’t want a tool that cuts.  You want to push the clay so you get a rounded edge.  That looks a lot more natural.  I’ve spent actual years gathering my rounded pointy things at flea markets, the dentist and yard sales.  As above, jewelers wax working tools work well with polymer clay. Once you’ve worked at making creatures for a bit you’ll know the shapes you want in a tool and will be able to spot them. Dowels can come to your rescue.  A dowel about the diameter of a pencil is best.  Cut it into several pencil sized lengths.  Put the ends into a pencil sharpener and sharpen them to various points.  Sand the points to nice rounded points of various sizes.  Now you can make nostril holes, belly buttons and other orifices easily. 

Sandpaper and Texture Dowels

I like 60 grit sandpaper for adding texture.  Texture makes the creatures look much more finished.  It hides all the little imperfections.  I tear a sheet into pieces and use a different piece for each color.  Write the color on the back so you don’t mess up and get red bits on that yellow creature you just spent an hour on.  I took some of those dowels with points on them and dipped them in Elmer’s Glue and then into white sand.  I use those for getting texture into tight spots like under lips or arms or around warts.  Again, one for each color.

Cutting Blades

A sharp pocket knife will do.  An Exacto knife is better for precise cuts and trimming.  A large craft razor can cut larger pieces without crushing them.

Making a Thing

Shaping a Lump

My goal is to make a smooth shape from aluminum foil. To do this I crumple it as tightly as possible and then use the plexiglass cylinder to pound the surface flat and smooth. Given the method the final shape is somewhat unpredictable but that doesn’t matter as we don’t know what it’s going to be yet. Note the roll of floral tape there.

Homemade Roller Setup

Here’s the acrylic cylinder used as a roller to make thin slab. The foil shape has been wrapped completely with floral tape. The slab will be the thickness of shish kabob skewers. That’s about right as it will be textured and other bits will be pressed onto it. Here is where a pasta press would come in handy. It would do this part quickly.l

Wrapping

Wrap completely. Use excess to cover bar spots. I use a dull tool to cut off excess so as to not scratch my marble tile work surface.

Rolling Away the Lumps

Wrapping the armature results in overlaps and joints which the roller smoothes out nicely.

Adding Texture

No matter how much you go over it with the roller it will always look a little lumpy. Texture saves the day. I use heavy grit sandpaper. It eliminates all the little imperfections that a smooth surface would show.

Legs and Pods

Since the shape is elongated it’s obvious that it needs lots of short tentacles. Each tentacle needs a base of course. I roll out a snake and cut it into equal sections.

Making Tentacle Pods

Having cut the sections out I roll them into balls and roll them again on the sandpaper so the texture matches the body.

Pressing in the Tentacle Pods

I use the butt end of one of my tools to push the pod against the body. The texture on each helps weld the pod to the body. At the same time a dimple is left into which I can insert the end of the tentacle. That makes it look like the tentacle is extending out of the pod.

It Needs Spikes

It occurs to me here that the body is too plain. It’s needs glow in the dark spikes. Step one is to make pods for the spikes. Once again little textured balls are necessary.

Spikes and a Happy Face

The spikes are made the same way as the short tentacles. I used glow in the dark clay for the spikes as well as the teeth and eyes. I dread the day I run out. They don’t make it anymore. Note the tools. To the right is the blunt pointy thing. I have no idea what it was for but it’s my favorite. I got it at a flea market. To the left is one of those jeweler’s wax tools. It’s flat and thin and useful for many things. I will use it to pry up that smiley toothy mouth part for example.

Now We’re Getting Somewhere

To make the teeth I roll out a thin snake and then cut it into even lengths. I roll those out into little rounded rectangles which I press flat and then divide in half. Each half is a tooth. I lay those out on a flat mouth shape slab of black and trim that with red lips. Then I use the flat deal to pry it off the work surface and wrap it around the front of the creature.

Short Tentacles

Having been distracted by making luminous spines and the face I remember to finish the tentacles. This time I make equal balls then roll them out to a taper on the sandpaper to make short tentacles.

A Thing

To make the eyes I roll out a careful snake and cut it exactly in half. Roll each half into a ball. Ditto for the pupils. Put the eyeball on the body before placing the pupil. That way it’s easier to see exactly where the pupil should go. The very last thing is to poke a hole in the body to let the heated gases escape when in bakes. Otherwise the surface will blister. That’s it. I use the flat deal to pry it off and put in the baking tin. I still don’t know what it is.

Get a project quote today!

We’ll put together a customized quote about your project and work with you to get started on your project. Let’s build something together!

Get in touch today!

Filed Under: Blog, Members, Newsletter, September 2021 Newsletter Tagged With: article, September 2021 Newsletter Author: George Heath

Bringing Sculpture to Future Frontiers in New Collaborative Project

Scott Price –

What if your sculpture could be seen anywhere, at any time? What if your sculpture could be experienced from all angles in 3 dimensions as if it was right in front of an appreciative patron or art lover, even though your original physical sculpture was still in your studio a thousand miles away? What kind of possibilities and opportunities could this create for you to get cutting edge exposure of your work through a whole new way to interact with 3D art?

Price Sculpture Forest, Pacific Northwest Sculptors, and Prefixa are partnering to push the boundaries of sculpture exhibition, technology, interactivity, availability, and viewer experiences.

Chas Martin, president of Pacific Northwest Sculptors, connected with Miguel Arias, founder of the California technology company Prefixa that specializes in new advanced visual and immersive experiences. In parallel, Scott Price, founder of Price Sculpture Forest located on Whidbey Island, was researching how to bring augmented reality sculpture for visitors to expand their onsite art experience in a big, modern way. Miguel was a featured speaker at a recent monthly PNWS members meeting, and that convergence sparked a great collaboration that is now growing.

The vision is for augmented reality renditions of sculpture to be displayed in a sculpture park on a pedestal. This will meld and blur the historical distinction between in-person sculpture experiences and detached, location-independent augmented reality experiences. An artist will be able to have their work displayed virtually for an audience that would otherwise never have experienced the artist’s work. With the increasing presence and computing power of mobile phones, augmented reality allows visitors to interact, control, and have fun with how they experience the art.

Prefixa has developed technologies and easy to use processes for a sculptor to convert their sculpture into the company’s format and customizable phone app. All the high-tech wizardry will be performed behind the scenes by Prefixa, requiring only minimal, non-technical steps to be performed once by the artist.

Then Prefixa will create a high-resolution, realistic representation of an artist’s work that can be viewed from all sides. At the Sculpture Forest, the visitor will look at their smart phone screen to see the augmented reality sculpture overlaid on a physical pedestal. The viewer can physically walk around your sculpture where it sits in virtual space, observing it from all angles up, down, left, and right from 360 degrees around in all directions. If the viewer wants to see the other side of your sculpture, they walk to the other side of the pedestal that your sculpture is sitting on in augmented reality, just like they would if your sculpture was displayed there.

This is an exciting new frontier for physical art merging with digital space and modern interaction modalities. It spans time and space, and this even opens up future opportunities for NFT (non-fungible token) art sales. Only a few sculpture parks around the world have exhibited digital 3D art. In addition, they have generally been purely digital software that was not based upon original physical sculptures. The few attempts up to now have been created more by software designers and digital designers with an artistic flair, rather than sculptors of physical materials. This new collaborative effort is based on our shared reality of physical sculptures and transforms them for public exhibition at a physical sculpture space into interactive augmented reality. We will be venturing into new frontiers here.

The three partners are currently working on multiple aspects of building out this new experience. The program, physical space, and funding is being led by Price Sculpture Forest. The underlying technology, approach, and custom app is being developed by Prefixa. Pacific Northwest Sculptors will lead in getting the word out to sculptors of this new opportunity and helping with the upcoming Call for Artists and exhibition.

If this excites you, please consider a donation toward the technology and program startup costs. You can donate at www.SculptureForest.org/donate and specify it go toward the Augmented Reality Sculpture Project.

Stay tuned for more updates as we get this unique and groundbreaking effort launched.

Filed Under: Activities, Blog, Newsletter, September 2021 Newsletter Tagged With: AR, article, augmented reality, mixed reality, MR, September 2021 Newsletter, virtual reality, VR Author: Chas Martin

Virtual Reception for “Emergence” Exhibit

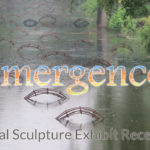
Pacific Northwest Sculptors hosted a virtual for the “Emergence” online sculpture exhibit. View the recorded event. The reception celebrated the first online sculpture exhibit presented by the group. Entrants from 32 states submitted over 500 works.

View Reception Video
View Exhibit
Best of Show: John Siblik – River Weaving,

Author, critic and curator, Richard Speer was the juror for the exhibit. He shared his observations and discussed his selections. The show included 61 pieces.

“River Weaving,” received the Best of Show award, created by John Siblik, Associate Professor of Art at Northern Illinois University. The environmental installation represents years of evolution from concept to realization. The piece includes 103 elements installed in a quarter mile of river.

As Siblik describes his installation, “The river forms the Warp and the Elements placed in the river form the Weft. Each Element is 6 feet by 3 feet by three feet. The elements are made from Willow canes which often grow along rivers, marshes and wetlands. The original design for River Weaving dates to 1986.”

Other award winners include: First place to Stephanie Robison; Second Place to Gard Jones; and Honorable Mentions for Jessica Bodner and Karen Theisen.

Filed Under: Activities, Blog, Calendar, Events, Events-Archive, Journal, Newsletter, September 2021 Newsletter, Special Events Tagged With: article, September 2021 Newsletter Author: Chas Martin

Curator’s Statement: Emergence 2021

Emergence - Best of Show

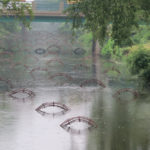
View the complete exhibit.

Richard Speer

This exhibition’s theme, “Emergence,” conjures the conundrum of expectation. We had by this late date hoped to have emerged from the shadow of the Covid-19 pandemic, yet the world still convulses in the wake of ever-mutating variants. In the realm of aesthetics, we often celebrate the promise of emerging artists—that is, artists who are young and fairly fresh out of academic programs or apprenticeships, poised and pliable at the advent of burgeoning careers—yet the truth is, creative leaps can and do emerge every bit as dramatically from the practices of mid-career and veteran artists. Youth has no monopoly on potential and growth. Given these contexts, I am delighted at the invigorating ideas emergent from the extraordinary field of sculptors who participated in our current exhibition, a dramatically eclectic mélange of media, techniques, and subject matter by artists ranging the spectrum of interests, backgrounds, ages, genders, educational pedigrees, and locales.

Emergence - Best of Show
Best of Show: John Siblik – River Weaving,

Thank you so much to everyone who submitted work. It was extremely challenging to narrow the field, and my choices necessarily reflect my personal tastes more so than any inherent notion of quality in ideation or execution. I think even a cursory glance at the checklist will show how broadly these artists cast their nets: works that are political in nature, environmentalist, utilitarian to formalist, earnest to whimsical, referencing historical art movements and current events, engaging consideredly with the provinces of design and decorative arts as well as conceptualism. There is plenty of room at the table and plenty to be optimistic about. It may not seem so during our dark nights of the soul, but we are in fact emerging; irrespective of circumstance we are always emerging into new selves like the chrysalis or the chambered nautilus. The sun always emerges from the clouds; it just likes to take its time. What we do in the meantime is infinitely enriched by the friendly company we keep and the beauty of the arts we enjoy.

Congratulations to our participating artists, whose tenacity and invention are inspirations to us all, the morsels and feasts that feed our very souls.

—Richard Speer is a critic, curator, and author whose reviews and essays have appeared in ARTnews, Art Papers, ArtPulse, Visual Art Source, The Los Angeles Times, The Chicago Tribune, Salon, and Newsweek. His most recent book is “The Space of Effusion: Sam Francis in Japan,” published by Scheidegger & Spiess as a companion publication to “Sam Francis and Japan: Emptiness Overflowing,” the exhibition he is co-curating in 2023 at the Los Angeles County Museum of Art. For more information, please visit www.richardspeer.com.

Richard Speer - Juror, Author, Critic, Curator
Richard Speer – Juror, Author, Critic, Curator -Photo by Adam Bailey-

Filed Under: Blog, September 2021 Newsletter Tagged With: September 2021 Newsletter Author: Chas Martin

Primary Sidebar

Learn more about being a member of Pacific Northwest Sculptors.

Support PNWS

Who’s Doing What: March 2023

By Chas Martin

Member meetup and Studio tour March 29

By Bob Deasy

PNWS material and intangible

By Andy Kennedy

Coming to the Southeast Portland’s Goat Blocks in early summer

By Bob Deasy

The Rewards of Transition

By Chas Martin

Let’s Be Friends

  • Email
  • Facebook
  • Instagram

Contact Us

Pacific Northwest Sculptors
4110 SE Hawthorne Blvd #302
Portland, OR 97214
president@pnwsculptors.org

Affiliates

Tualatin Valley Creates
International Sculpture Center

Subscribe

Receive our monthly newsletter and event announcements.
  • Home
  • About
  • Board
  • Member Directory
  • Login
  • Contact
  • Join
  • Legal

© 2020–2023 Pacific Northwest Sculptors